How to Use Your Laptop as a Monitor for Your Mini PC
Introduction to Using a Laptop as a Monitor
In the evolving world of technology, efficient use of resources often leads to enhanced productivity and cost savings. One such resourceful tip is using your laptop as a monitor for your mini PC. This innovative approach can be particularly appealing for those looking to save space, utilize available equipment efficiently, or streamline their computer setup.
Primarily, using a laptop as a secondary monitor allows you to expand your screen real estate, creating a more immersive and productive workspace. Whether you’re a professional working on complex projects requiring multiple displays or a student managing various tasks simultaneously, augmenting your mini PC with a laptop screen can significantly bolster your workflow.
The process involves connecting the laptop to the mini PC, configuring the appropriate settings, and potentially using third-party software to facilitate the display transfer. This setup not only maximizes the use of your existing devices but also negates the need for investing in a dedicated external monitor, thereby reducing costs.
Additionally, such a setup is highly portable. For those frequently on the move, carrying a mini PC along with a compact laptop can be more convenient than lugging around a full-sized monitor. This allows for a flexible and adaptable work environment, regardless of location.
The benefits extend beyond mere convenience; using a laptop as an extended display can also contribute to improved ergonomics. By optimizing your screen arrangement, you can achieve better posture and reduced eye strain, which are crucial for long working hours.
Overall, leveraging your laptop as a monitor for your mini PC offers a pragmatic solution that aligns with modern technology demands and multifunctional usage. It’s an approach that blends efficiency, cost-effectiveness, and enhanced productivity, making it a worthwhile consideration for any tech-savvy individual.
Understanding the Technical Requirements
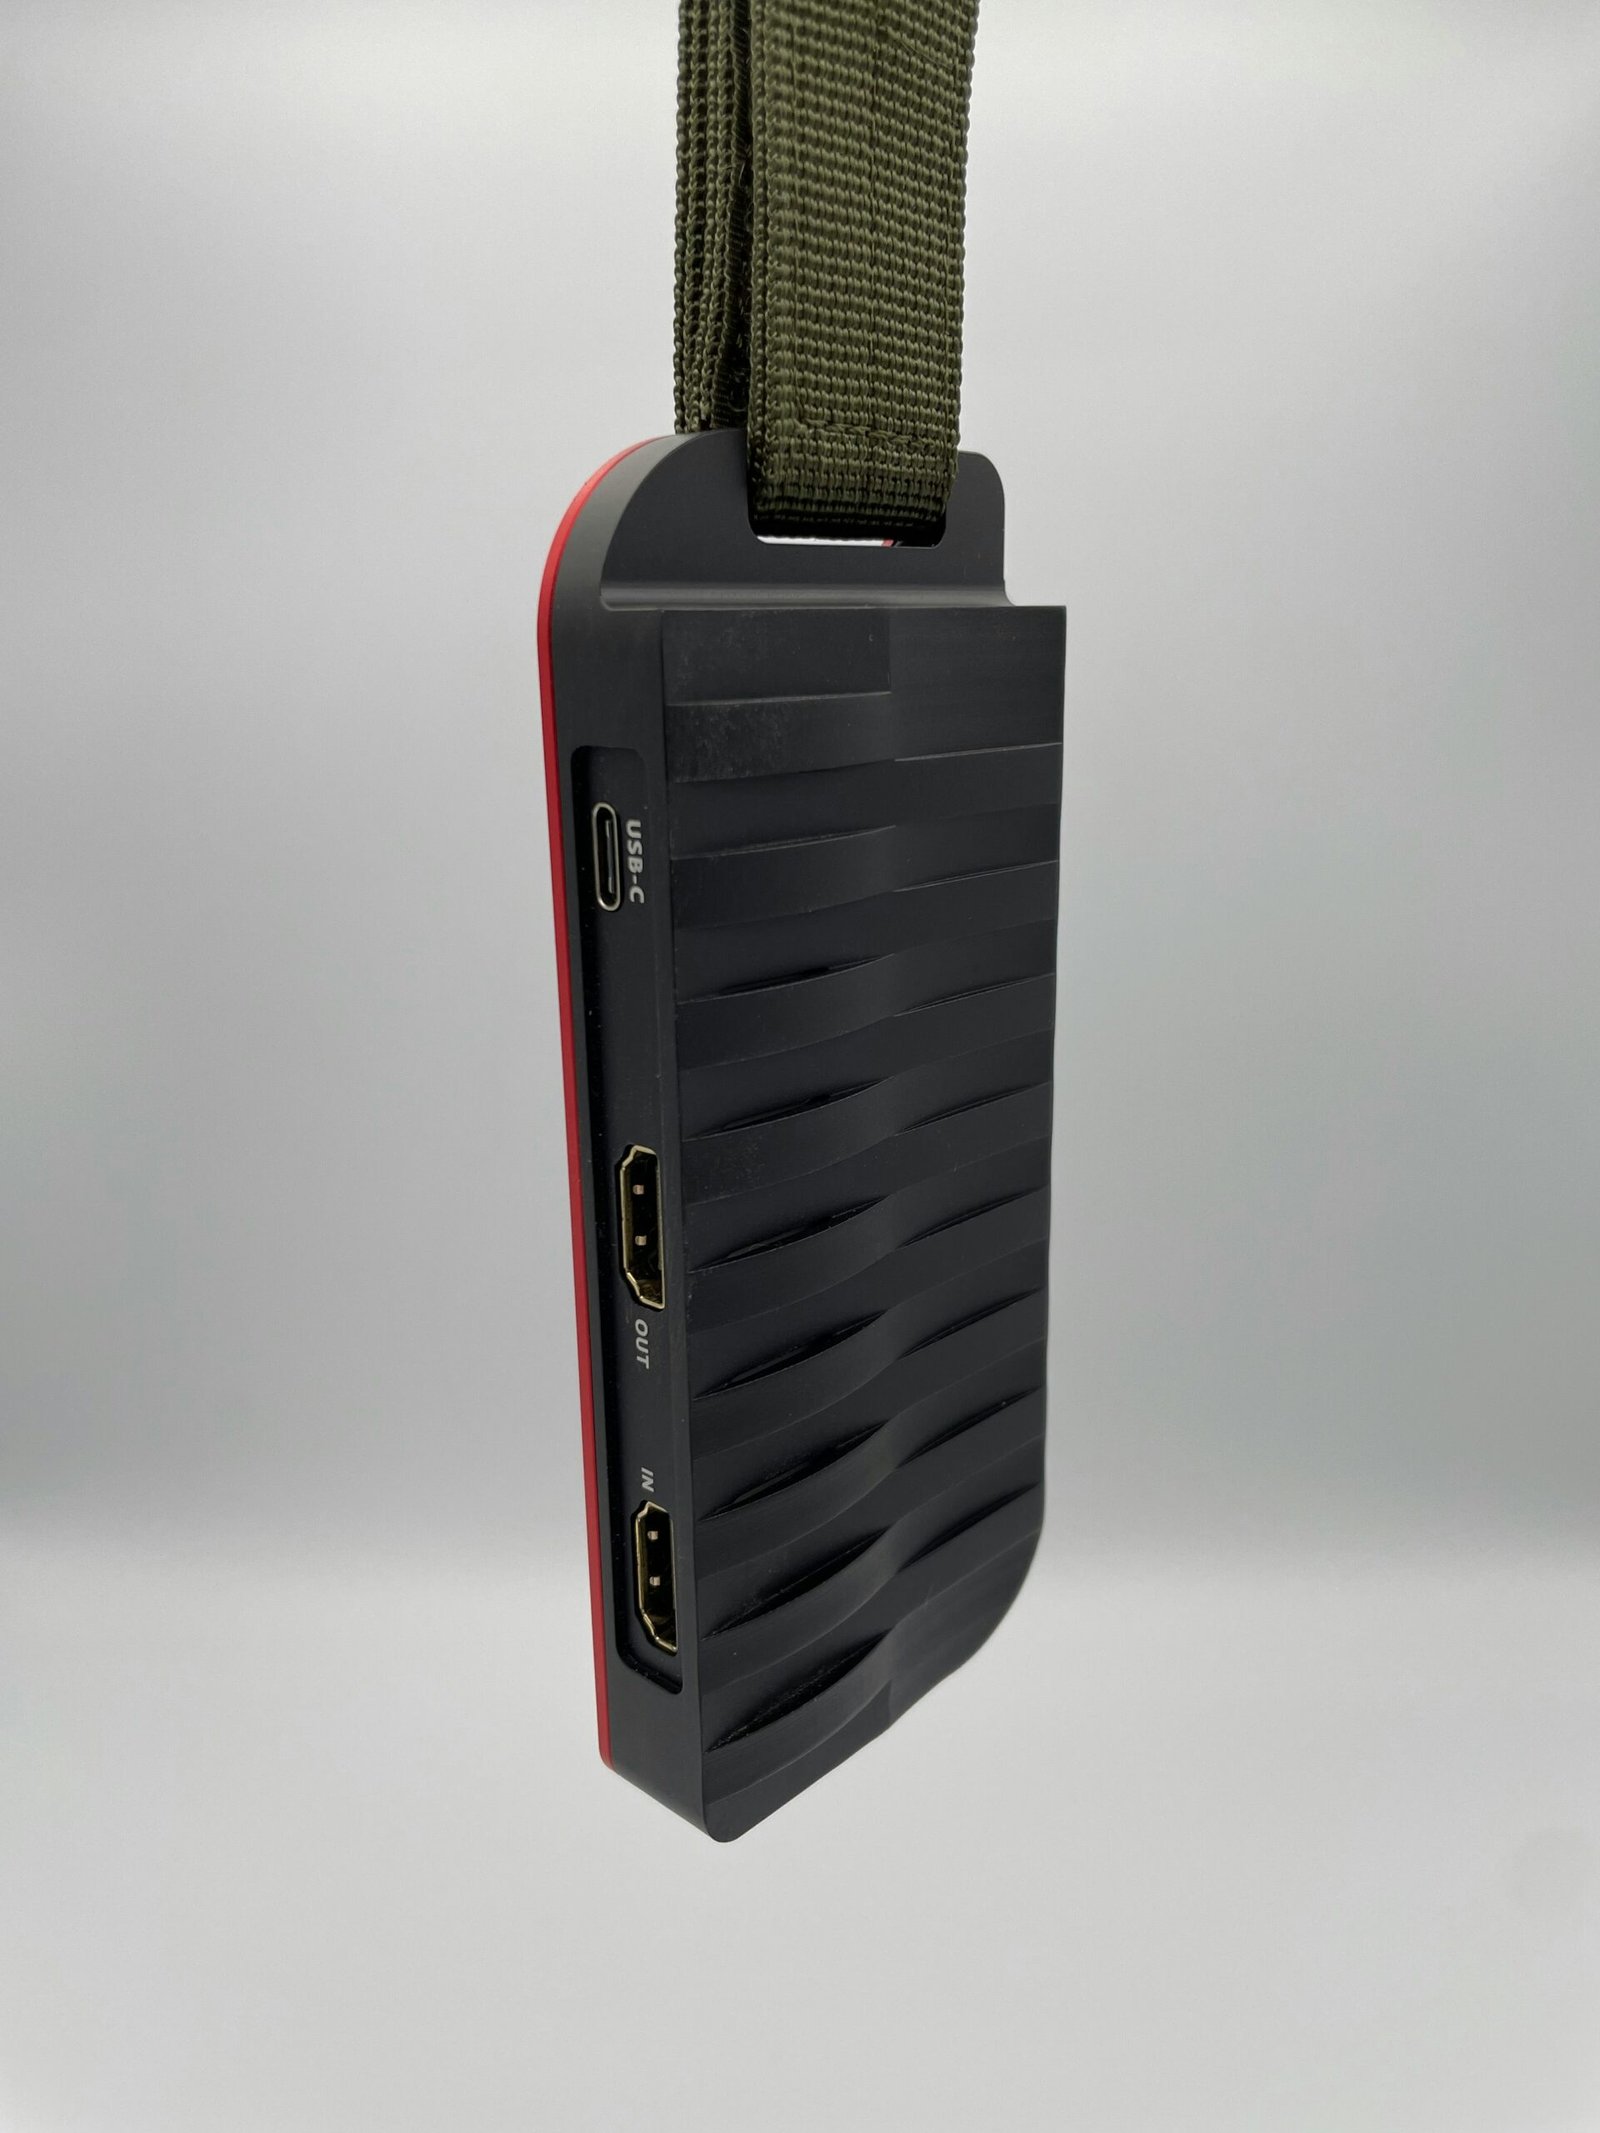
When using a laptop as a monitor for a mini PC, there are several technical requirements that one must meet to ensure a successful setup. To begin with, it is critical to understand the necessary hardware components, including ports and appropriate cabling. Most mini PCs and laptops come equipped with HDMI, DisplayPort, or USB-C ports. Ensuring compatibility between the mini PC’s output port and the laptop’s input port is a primary consideration. HDMI and DisplayPort are commonly used for video output, while USB-C may also serve the same function, depending on the device capabilities.
In addition to having compatible ports, the correct cables and adapters are essential. For instance, if the mini PC has an HDMI output and the laptop has an HDMI input, a standard HDMI cable will suffice. Conversely, if the ports differ, such as HDMI to DisplayPort, an appropriate adapter will be required. It is advisable to invest in quality adapters and cables to maintain optimum signal integrity and prevent potential issues, such as signal loss or poor video quality.
Beyond hardware, specific system configurations and settings within the BIOS, or Unified Extensible Firmware Interface (UEFI), may need to be adjusted. These settings might include enabling external display support and configuring the mini PC’s output settings to match the resolution and refresh rate supported by the laptop. Ensuring these configurations are correctly set can prevent display inconsistencies and improve overall performance.
Moreover, certain software tools or drivers could be required to utilize a laptop as a monitor for a mini PC. Software applications such as SpaceDesk, Splashtop, or Miracast can enable screen sharing and extended display functionality. Installing the latest drivers for your mini PC’s graphics card can also mitigate potential compatibility issues and enhance performance.
By carefully considering and addressing these technical requirements—compatible ports, proper cables and adapters, system settings, and requisite software—users can effectively use their laptop as a monitor for their mini PC, harnessing the full potential of both devices harmoniously.
“`html
Setting Up a Wired Connection
Connecting your laptop as a monitor for your mini PC via a wired connection can be an efficient and straightforward process. Begin by ensuring that your laptop and mini PC have the necessary ports for a wired connection. Typically, you may need an HDMI to USB-C adapter or an HDMI to HDMI connection, depending on the available ports on both devices.
Firstly, power off both your laptop and the mini PC to avoid any electrical issues. Connect one end of the HDMI cable to the mini PC’s HDMI output port. If your laptop only has a USB-C port, you will need to connect an HDMI to USB-C adapter to the other end of the HDMI cable, then insert the USB-C end into your laptop’s USB-C port.
Once the physical connections are securely fastened, power on both devices. Your laptop should automatically detect the mini PC and display its output. If the display does not automatically switch, you may need to manually select the correct input source. For laptops, this function can usually be accessed through display settings found in your system preferences or control panel.
In some cases, you may encounter display issues such as no signal or low resolution. To troubleshoot, verify the cables are securely connected and functioning properly. It may help to test the cables with another device to ensure they are not faulty. Another common issue could be outdated or incompatible drivers. Ensure both your laptop and mini PC have the latest drivers installed by visiting the manufacturer’s website and downloading the appropriate updates.
Additionally, verify that the chosen input source on your laptop matches the port to which your mini PC is connected. This step is crucial, as incorrect input source selection can lead to a blank screen. If the problem persists, consider adjusting the display settings on both devices, ensuring the screen resolution and refresh rate are set to compatible levels.
“`
Setting Up a Wireless Connection
For users who prefer a cable-free setup, establishing a wireless connection between your laptop and mini PC offers a convenient alternative. There are different technologies and software solutions available to facilitate a seamless connection. Below, we explore Wi-Fi Direct, wireless HDMI, and proprietary software solutions such as Miracast and AirPlay, along with instructions on configuring these technologies.
Wi-Fi Direct: Most modern laptops and mini PCs support Wi-Fi Direct, a feature that allows direct peer-to-peer connections without a router. To set this up, ensure both your laptop and mini PC are Wi-Fi Direct compatible. On your mini PC, go to the network settings, and enable Wi-Fi Direct. On your laptop, navigate to the Wi-Fi settings, search for available devices and select your mini PC from the list. Follow any on-screen prompts to complete the connection process, and you should see your mini PC’s display on your laptop.
Wireless HDMI: Wireless HDMI transmitters provide a robust alternative for high-definition streaming without the need for physical cables. Connect the transmitter unit to your mini PC’s HDMI output and the receiver unit to your laptop’s HDMI input using an HDMI dongle or adapter if necessary. Power on both devices, and they should automatically pair, transmitting the mini PC’s display to your laptop.
Miracast: Miracast is a wireless display standard that mirrors your mini PC’s display to your laptop. For Windows users, press the “Windows + K” keys on your laptop, choose “Connect to a wireless display,” and select your mini PC from the list. The devices will pair, allowing you to use your laptop as an extended or mirrored display. Both devices need to support Miracast for this option to work.
AirPlay: Apple users can take advantage of AirPlay to connect their MacBook to a compatible mini PC. On your MacBook, navigate to the AirPlay icon in the menu bar, and select your mini PC from the displayed list. The devices will connect, enabling you to extend or mirror your mini PC’s display onto the MacBook.
These wireless technologies present user-friendly solutions for those who value flexibility and minimal clutter. By following the above steps, you can efficiently use your laptop as a monitor for your mini PC without relying on cumbersome cables.
Using Software Solutions
When aiming to use your laptop as a monitor for your mini PC, leveraging third-party software solutions is a practical approach. Several applications can transform your laptop into an additional display for your mini PC, each with unique features and benefits designed to enhance usability and compatibility.
One popular choice is SpaceDesk, known for its simplicity and robust performance. To use SpaceDesk, install the server software on your mini PC and the viewer software on your laptop. This setup allows your laptop to connect to your mini PC over a local network, transforming the laptop into an additional monitor. SpaceDesk supports Windows platforms and is renowned for offering minimal latency, making it a go-to solution for everyday multitasking and even some light gaming.
Splashtop is another viable option, particularly favored for its versatility and remote access capabilities. While primarily recognized as a remote desktop solution, Splashtop can also extend or mirror displays. Begin by downloading the Splashtop Streamer on your mini PC and the Splashtop Personal app on your laptop. Configure the applications via your Splashtop account, enabling the features necessary to use your laptop as a secondary screen. Splashtop’s cross-platform support extends its usefulness to various operating systems, including Windows, macOS, iOS, and Android.
Duet Display, originally designed for Apple devices, now offers support for Windows PCs. This software provides a seamless experience when using an iPad or Mac as a second display, with recent updates extending support to Windows laptops too. To use Duet Display, install the Duet software on both devices and connect via a USB cable or wireless connection, ensuring a stable and high-performance extension of your display. This software excels in providing smooth graphics and touch-screen support, enhancing the overall interactivity.
When considering which software to use, comparisons based on ease of use, compatibility, and performance are crucial. SpaceDesk offers straightforward installation and low latency, ideal for quick setup and use. Splashtop, with its extensive platform support and additional remote access capabilities, offers greater versatility. Duet Display provides a superior touch screen experience and stable performance but may be more confined to Apple ecosystems. Ultimately, the choice depends on individual needs and system compatibility, ensuring a tailored and efficient setup for using your laptop as a monitor for your mini PC.
Managing Settings and Performance
Optimizing your display settings is crucial to ensuring the best visual experience and performance when using your laptop as a monitor for your mini PC. Begin by adjusting the resolution to match the capabilities of your laptop’s screen. For most modern displays, a resolution of 1920×1080 pixels is typically ideal, though higher resolutions like 2560×1440 or even 3840×2160 may be suitable for more advanced setups.
Scaling is another essential factor to consider. Proper scaling ensures that text and images are displayed clearly and appropriately sized. This setting can usually be found in the display settings menu of your operating system. Setting the right scaling option prevents icons and fonts from appearing too small or too large, maintaining an optimal balance between usability and aesthetics.
Refresh rate is also a key parameter that directly affects the smoothness of on-screen motion. The higher the refresh rate, the more fluid the visual experience. Common refresh rates include 60Hz, 120Hz, and 144Hz. If your hardware supports it, opting for a higher refresh rate can significantly enhance the user experience, especially during high-motion activities such as gaming or video playback.
Color settings further refine the visual output. Adjusting brightness, contrast, and color temperature can immensely improve image quality. Customizing these settings ensures colors are accurate and comfortable for prolonged viewing periods, which is crucial for reducing eye strain during extended use.
Managing power consumption is another important consideration, particularly to extend the lifespan of your laptop battery. Dimming the screen brightness, enabling power-saving modes, and closing unnecessary applications can help in reducing power consumption without compromising performance. Additionally, ensuring your mini PC maintains an efficient cooling system can prevent overheating and maintain consistent performance.
Lastly, minimizing latency is critical for smooth operation, especially if real-time interactions are essential. Using a high-quality connection method, such as HDMI or USB-C, and avoiding wireless connections when possible, can significantly reduce latency. Furthermore, double-checking all cables and connectors for secure fits can mitigate common issues related to input/output lag.
Common Challenges and Troubleshooting Tips
When transforming your laptop into a monitor for your mini PC, several common issues might arise that could hinder seamless operation. Addressing these potential problems properly can help ensure a smooth and efficient setup process.
Connectivity Issues
A frequently encountered challenge is connectivity issues. If the laptop doesn’t recognize the mini PC, first examine the connections. Ensure that all cables are securely attached and that the correct ports on both devices are being used. For wireless setups utilizing WiFi Direct or Bluetooth, verify both devices are on the same network and that wireless compatibility is enabled on each device.
Display Recognition Failures
Display recognition failure is another common hurdle. If the laptop doesn’t recognize the mini PC’s display, ensure that the mini PC is set to output to an external display. On most systems, this setting is found in the display settings menu and can usually be toggled automatically. Additionally, update your display drivers on both devices to ensure all components are compatible.
Screen Flickering
Screen flickering problems can be particularly troublesome. If your screen constantly flickers, this could suggest an issue with the refresh rate settings. Adjust the refresh rate in the display settings, ensuring that both the laptop and mini PC settings match. A lower refresh rate can sometimes mitigate flickering if compatibility issues are present.
Audio Challenges
Audio challenges often go hand in hand with visual issues. If audio output isn’t functioning as expected, ensure that the default audio output device is set correctly. You can check this setting in the sound settings on your laptop. Sometimes, simply restarting both devices can resolve this problem.
By proactively addressing these common challenges, you can more reliably use your laptop as a monitor for your mini PC. A meticulous check of your settings and connections will mitigate most of these issues, helping you to achieve a hassle-free, efficient setup.
Conclusion and Additional Resources
In conclusion, using a laptop as a monitor for your mini PC offers a practical and cost-effective solution, enabling you to maximize the utility of your existing devices. To summarize, this blog post has outlined critical steps for connecting your mini PC to your laptop, including various methods such as utilizing software solutions, leveraging Remote Desktop Protocol (RDP), and using HDMI or USB-C connections. These methodologies ensure flexible and efficient usage of your technology.
Taking advantage of a laptop screen for your mini PC not only saves space but also reduces the need for additional hardware purchases, making it a sustainable choice. The convenience of mobility, paired with the capability to maintain productivity on the go, further illustrates the advantages of this setup.
For those seeking a deeper understanding or encountering complex issues during the setup, we have curated a collection of additional resources that offer comprehensive support:
- Video Tutorial: Step-by-Step Guide to Using Your Laptop as a Monitor
- Community Forums: Troubleshoot and Exchange Ideas
- User Manuals: Detailed Device Instructions
These resources are invaluable for addressing any specific concerns you might have and ensuring that your setup process is seamless and successful. Whether you’re a novice or a tech-savvy user, the information provided will cater to all levels of expertise.